Let me be honest with you - when I first signed up I had no idea what I was doing. I read the landing page, thought “okay this seems straightforward,” clicked start, and then just… sat there staring at the dashboard not knowing what to do first.
Nobody told me there was an order to things. I kept clicking around randomly, accidentally skipped steps that mattered, and wasted about four days of my trial doing basically nothing useful.
So this post is what I wish someone had written before I started. Not a marketing version. The actual sequence.
Before you do anything - understand what you’re actually launching
This sounds obvious but it isn’t. A lot of people sign up expecting to build something from scratch. You’re not. Sellvia gives you a store that’s already built and already has products loaded into it. Your job is not to create - your job is to configure, launch, and drive traffic.
That mental shift matters because it changes where you spend your time. You don’t need to spend three days picking colors and fonts. The store looks good out of the box. What you need to do is get it live and get the advertising turned on as fast as possible. Everything else is secondary.
Step 1 - Sign up and get through the trial setup
The free trial is 14 days. You also get a $40 advertising coupon which is genuinely useful - more on that later.
When you first log in you’ll see your dashboard. It’s cleaner than most ecommerce platforms I’ve seen. The main things you’re looking at are your store, your product catalog, and the advertising section.
Don’t touch the advertising yet. Go to your store first.
Step 2 - Look at your store before you change anything
This is the step most people skip. They log in, immediately start editing things, and break something that was working fine.
Open your store the way a customer would see it. Click through a few products. Go through the checkout flow. Look at it on your phone because that’s how most of your customers are going to see it too.
Ask yourself: does this look like somewhere I would buy something? If the honest answer is yes - leave it mostly alone and move to the next step. If something looks obviously wrong, fix that specific thing. Don’t redesign the whole store because you’d personally pick a different shade of blue.
Step 3 - Pick your products
Your store comes pre-loaded with products from the Sellvia catalog - guides, courses, checklists, and digital tools across different topics. You don’t have to sell all of them. In fact, trying to sell everything at once is one of the most common early mistakes.
Pick a focus. Look through the catalog and find a category that either interests you or feels like something people you know would actually buy. You don’t need a deep passion for the topic - you need to be able to answer the question “who would buy this and why?”
A focused store with 8-12 products in a clear category will almost always outperform a store with 60 products across six unrelated topics. The person who lands on your store needs to immediately understand what you’re about. If they can’t, they leave.
Remove products that don’t fit your focus. Add the ones that do. This doesn’t take as long as people think - an hour of honest curation is enough at this stage.
Step 4 - Set up your payments and balance
This is the step that trips people up the most and it’s also the least glamorous so everyone skips past it in tutorials.
When a customer buys something from your store, you need to process that order. Processing the order costs money - that’s the product cost, which comes out of your Sellvia balance or your linked payment method. After you process the order, your commission gets credited to your Sellvia Payments balance.
So the sequence is: customer pays - you process - you pay product cost - your commission gets credited - after the risk reserve period you can withdraw (minimum $100, wire or ACH).
What this means practically: you need money available to process orders before the commissions come in. If your balance is empty when a sale comes through and you’re not set up to process it manually, you miss the sale and the commission.
Set up your balance before you launch. Even putting $50-100 on your Sellvia balance from day one means orders can process automatically and you don’t have to babysit every transaction. This is not optional if you’re serious about this.
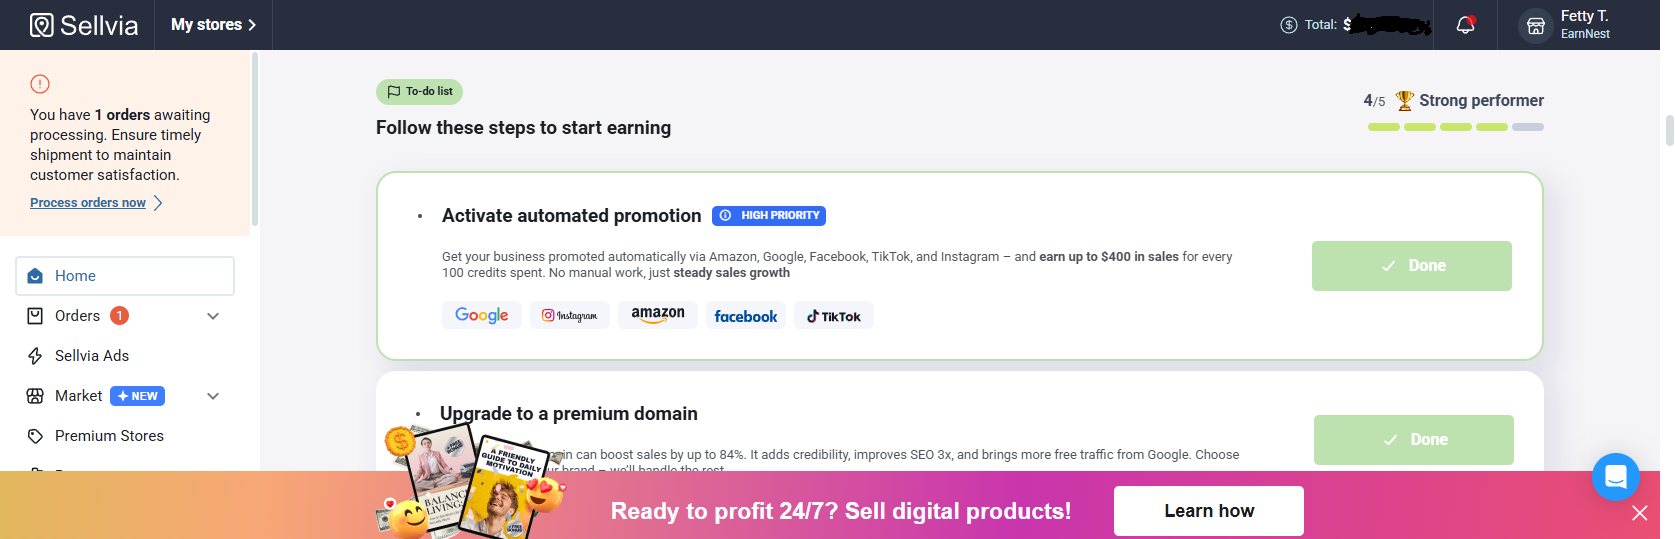
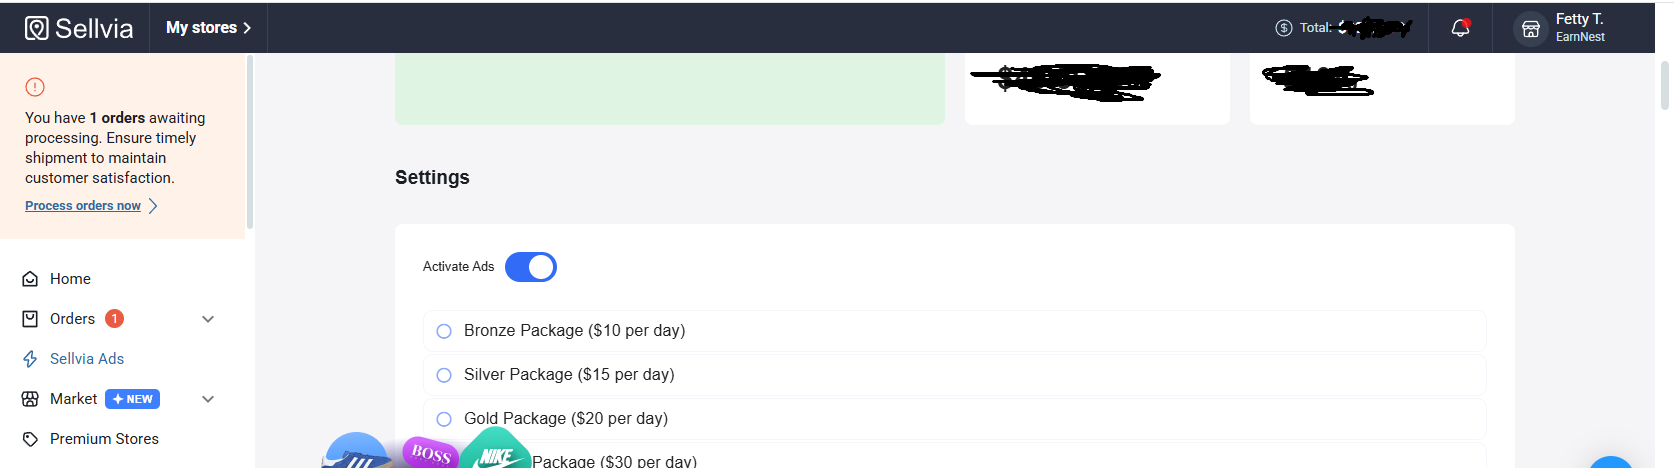
Step 5 - Turn on the advertising
This is the moment everything either starts working or reveals a problem.
Sellvia’s built-in advertising system is genuinely different from anything else I’ve used. You don’t set up targeting. You don’t write ad copy. You don’t design creatives. You set a daily budget, turn it on, and the system handles the rest.
Start with the $40 coupon you got during trial. That’s essentially free advertising to test whether your store setup is working.
The recommended starting budget once the coupon runs out is $10-20 per day. That’s enough for the system to start collecting data and delivering your store to real buyers. Going lower than $10/day means the system doesn’t have enough to work with and results will be inconsistent.
What you’re looking for in the first 48-72 hours: are people landing on your store? Are they clicking on products? Are they adding things to cart? If yes to all three - your setup is basically working and it’s a volume game from here. If traffic is landing but nobody is clicking products, your product selection might be the issue. If people are clicking products but not adding to cart, look at your product pages and pricing.
Step 6 - Watch the numbers, not the dashboard
The dashboard feels addictive in the first few days. You’ll refresh it constantly. That’s normal. But the number you actually need to watch is not your traffic - it’s your add-to-cart rate and your conversion rate.
Traffic without conversions just means your ads are working but your store isn’t. Conversions without enough traffic means you need to increase your budget. Both problems have different solutions and confusing them wastes a lot of time and money.
Give the system at least 5-7 days before drawing any conclusions. Ad algorithms need data to optimize. Pulling the plug after 48 hours because you haven’t made a sale yet is the single most common reason people quit right before things start working.
Step 7 - Process your first order and feel the whole thing become real
When that first order comes in - and it will - process it immediately. Don’t wait. Don’t second guess it. Go through the processing flow, confirm everything looks right, and let it complete.
That first processed order is when the business stops feeling abstract and starts feeling real. Your commission gets credited. The customer receives their digital product automatically. You didn’t have to do anything except process the order.
That’s the model working as designed. Your job from that point is not to change what’s working - it’s to scale it.
The honest part nobody puts in tutorials
The launch itself is actually the easy part. Sellvia has genuinely made the technical side as simple as it can be. The hard part is the week after launch when you have traffic but no sales yet and you have to hold your nerve and not start breaking things that just need more time.
Most people who fail at this stage don’t fail because the system doesn’t work. They fail because they run out of patience before the system has enough data to optimize. Or they run out of balance before their first commissions come in. Or they start changing their product selection every three days and never give anything a real test.
The launch is a beginning, not a destination. Get it live. Get the ads running. Fund your balance. Then give it real time.
Questions I actually want answered in the thread:
What was the one thing in the launch process that surprised you most - good or bad?
How long between turning on ads and your first sale?
Did you change anything about your store in the first week - and do you think it helped or hurt?
And for anyone who’s about to launch - what’s the specific thing you’re most unsure about right now?
Drop it below. The more specific the better.
![]()